Knowledge Base
  • Getting Started
    • Quick Start
    • Knowledge Base
    • Contact RoamingiQ
    • New Customer Onboarding
  • Network Equipment
    • Supported Access Points
    • Access Point Configuration Guides
      • What You'll Need
      • Ruckus Virtual Smart Zone 5.4
      • Ruckus Virtual Smart Zone 6.1
      • Ruckus One
      • Ruckus Unleashed
      • Cambium cnMaestro X
      • TP Link Omada Pro
      • Aruba Central
      • Cisco Meraki
    • Supported Routers
    • Router Configuration Guides
      • Mikrotik
  • Network Administrator Console
    • Network Administrator Console Introduction
    • Network Operator Settings
      • E-mail Templates
      • Terms and Conditions
      • Display Options
      • Network Administrators
      • Service Plans
      • FCC Broadband Labels
      • Keypools
      • Shopping Cart
        • Shopping Cart Payment Rules
      • Realpage
      • Webhooks
      • Network Operator Logs
      • Gateway Errors and Pending Changes
    • Creating a New Venue
      • Venue Details/General Information
      • Venue Details/Configuration Options
      • Overlapping Subscriptions
      • Add Venue Units
      • Add and Remove Service Plans to Venue
      • Add a Keypool to a Venue
      • Add Venue Administrators to a Venue
      • Add Equipment to a Venue
      • Configure Venue Shopping Cart
      • Connect a Venue to RealPage
      • Migrating a Venue to VAULT From Another Provider
    • Managing Your Subscribers
      • Add Subscribers to a Venue
      • View and Modify Subscriber Details
      • Ending a Subscription
      • Issuing a Refund or Credit
      • Messaging Subscribers
      • View Subscriber Bandwidth
      • View, Modify, and Test Subscriber Wi-Fi Passwords
      • View Subscriber Transaction History
      • View Subscriber Logs
      • View Subscriber Devices
      • View System Data
      • Permanently Delete a Subscriber Record
    • Managing Your Venues
      • View and Modify Venue Details
      • View and Modify Venue Units
      • Export Units
      • View Venue Bandwidth
      • View Venue Logs
      • View Venue Transaction History
      • Delete a Venue
    • How to Change Roles
    • SMS Sign Up
  • Venue Administrator Console
    • Venue Administrator Console Introduction
    • Venue Administrator Dashboard
      • Add Subscribers
      • Add Guests
      • Add Venue Administrators
      • Message Subscribers
      • Activity Summary
      • Service Status
      • Support Summary
      • Quick Search
      • Recent Service Activations
      • Renew or Confirm Upcoming Expirations
    • Managing Your Subscribers
      • View and Modify Subscriber Details
      • Ending a Subscription
      • View Subscriber Bandwidth
      • View Subscriber Transactions
      • Resend Activation E-mail
      • Export Subscribers
    • Support
  • Subscriber Console
    • Subscriber Console Introduction
    • Subscriber Account Activation
    • Subscriber Self-Sign Up
  • Developers
    • API Documentation
    • Sample Webhook Payloads
  • Property Management Group
Powered by GitBook
On this page
  • Configuration Steps Overview
  • Configure AAA Authentication Server
  • Configure AAA Accounting Server
  • Configure WLAN

Was this helpful?

  1. Network Equipment
  2. Access Point Configuration Guides

Ruckus Virtual Smart Zone 5.4

Here is a step-by-step guide on how to configure Ruckus Virtual Smart Zone 5.4 to work with VAULT.

PreviousWhat You'll NeedNextRuckus Virtual Smart Zone 6.1

Last updated 6 months ago

Was this helpful?

Configuration Steps Overview

  1. Configure AAA Authentication Server

  2. Configure AAA Accounting Server

  3. Configure WLAN

  4. Configure NAS-Identifier

Configure AAA Authentication Server

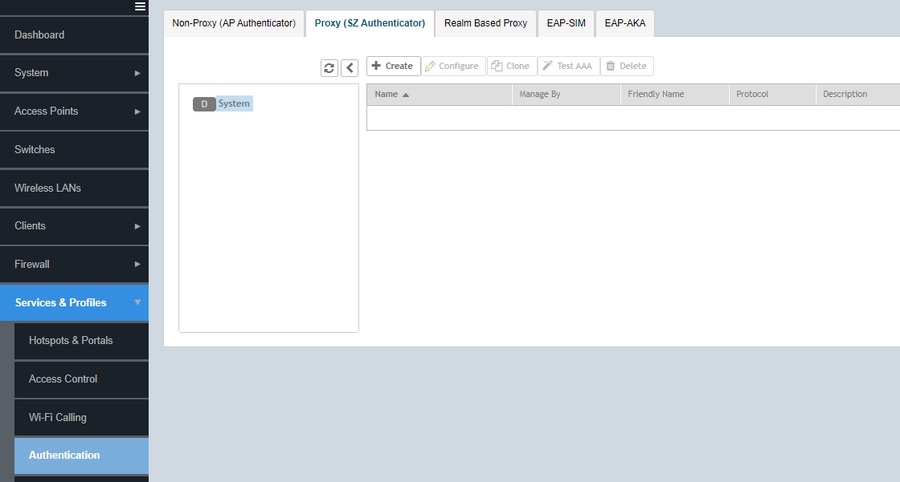
  1. Click Services & Profiles

  2. Click Authentication

  3. Click Proxy (SZ Authenticator)

  4. Click +Create

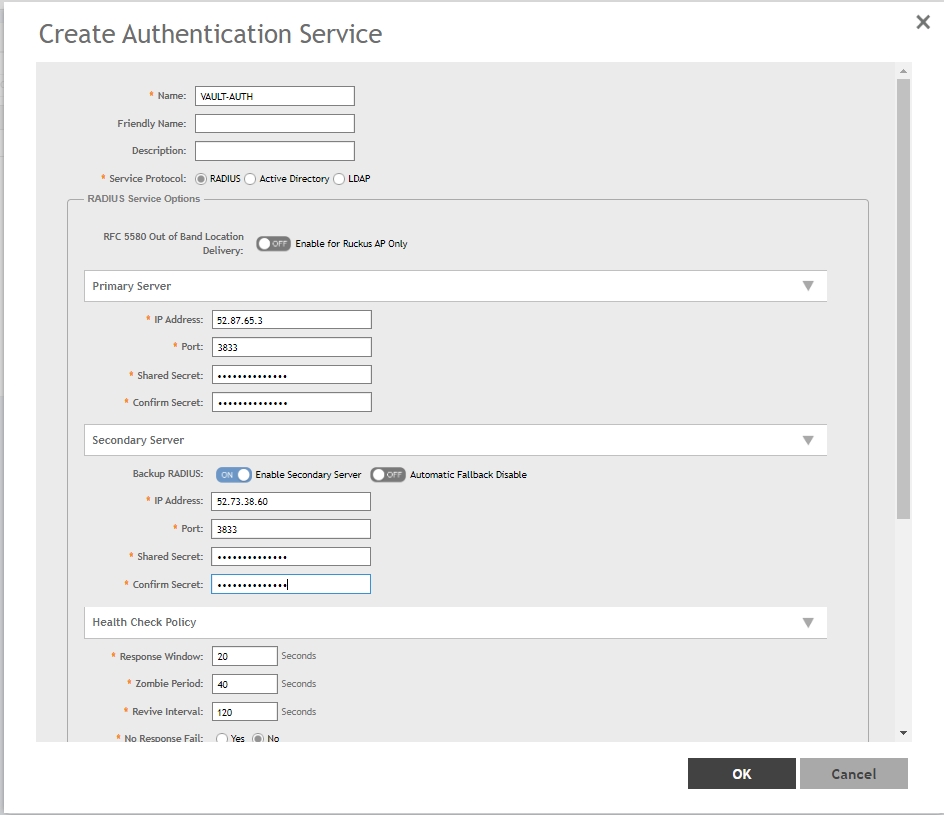
  1. Enter the following information

    • Name: VAULT-AUTH

    • Service Protocol: RADIUS

    • Primary Server

      • IP Address: xx.xx.xx.x

      • Port: xxxx

      • Shared Secret: XXXXXXX

      • Confirm Secret: XXXXXXX

  • Secondary Server

    • IP Address: xx.xx.xx.x

    • Port: xxxx

    • Shared Secret: XXXXXXX

    • Confirm Secret: XXXXXXX

    • Response Window: 20 Seconds

    • Zombie Period: 40 Seconds

    • Revive Interval: 60 Seconds

    • No Response Fail: No

    • Maximum Outstanding Requests (MOR): 0 Requests per Server

    • All other fields should be default

Configure AAA Accounting Server

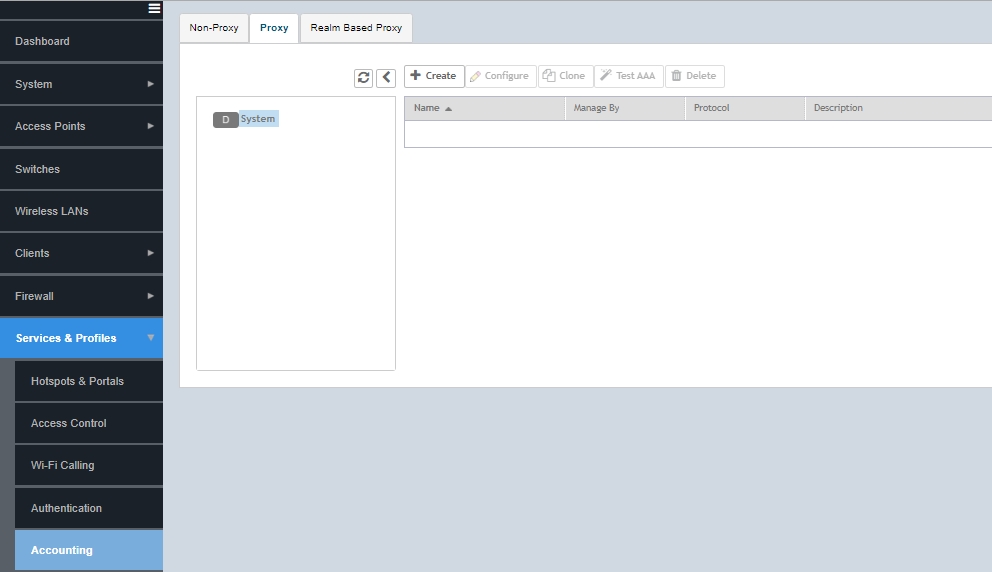
  1. Click Services & Profiles

  2. Click Accounting

  3. Click Proxy

  4. Click +Create

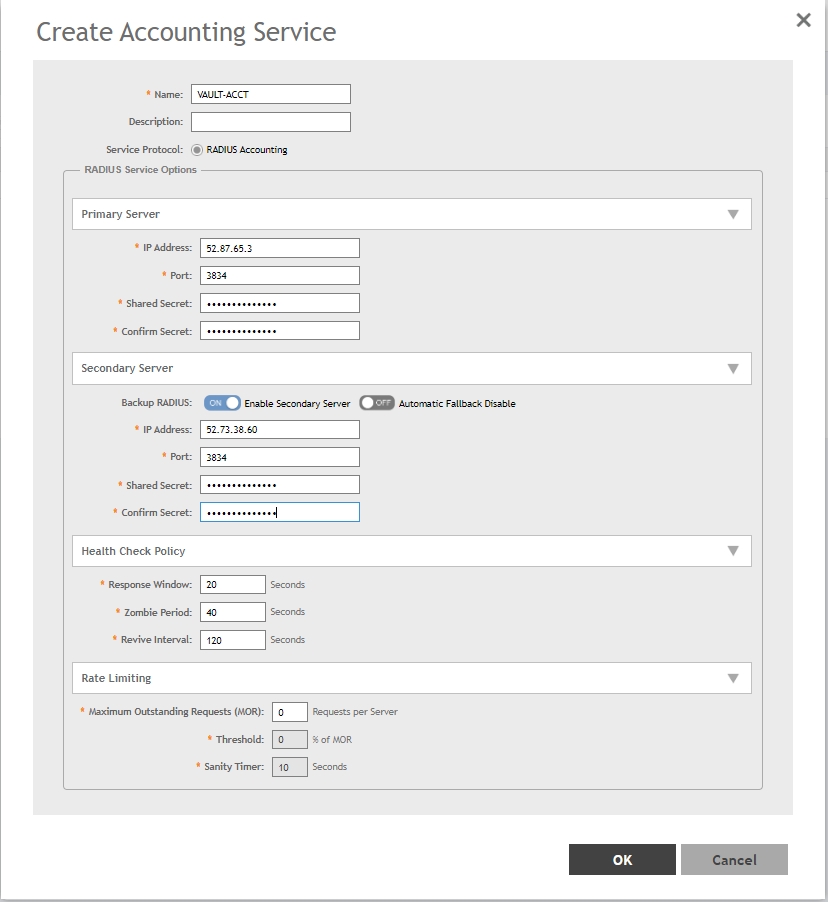
  1. Enter the following information

    • Name: VAULT-ACCT

    • Service Protocol: RADIUS Accounting

    • Primary Server

      • IP Address: xx.xx.xx.x

      • Port: xxxx

      • Shared Secret: XXXXXXX

      • Confirm Secret: XXXXXXX

  • Secondary Server

      • IP Address: xx.xx.xx.x

      • Port: xxxx

      • Shared Secret: XXXXXXX

      • Confirm Secret: XXXXXXX

    • Response Window: 20 Seconds

    • Zombie Period: 40 Seconds

    • Revive Interval: 120 Seconds

    • Maximum Outstanding Requests (MOR): 0 Requests per server

    • All other fields should be default

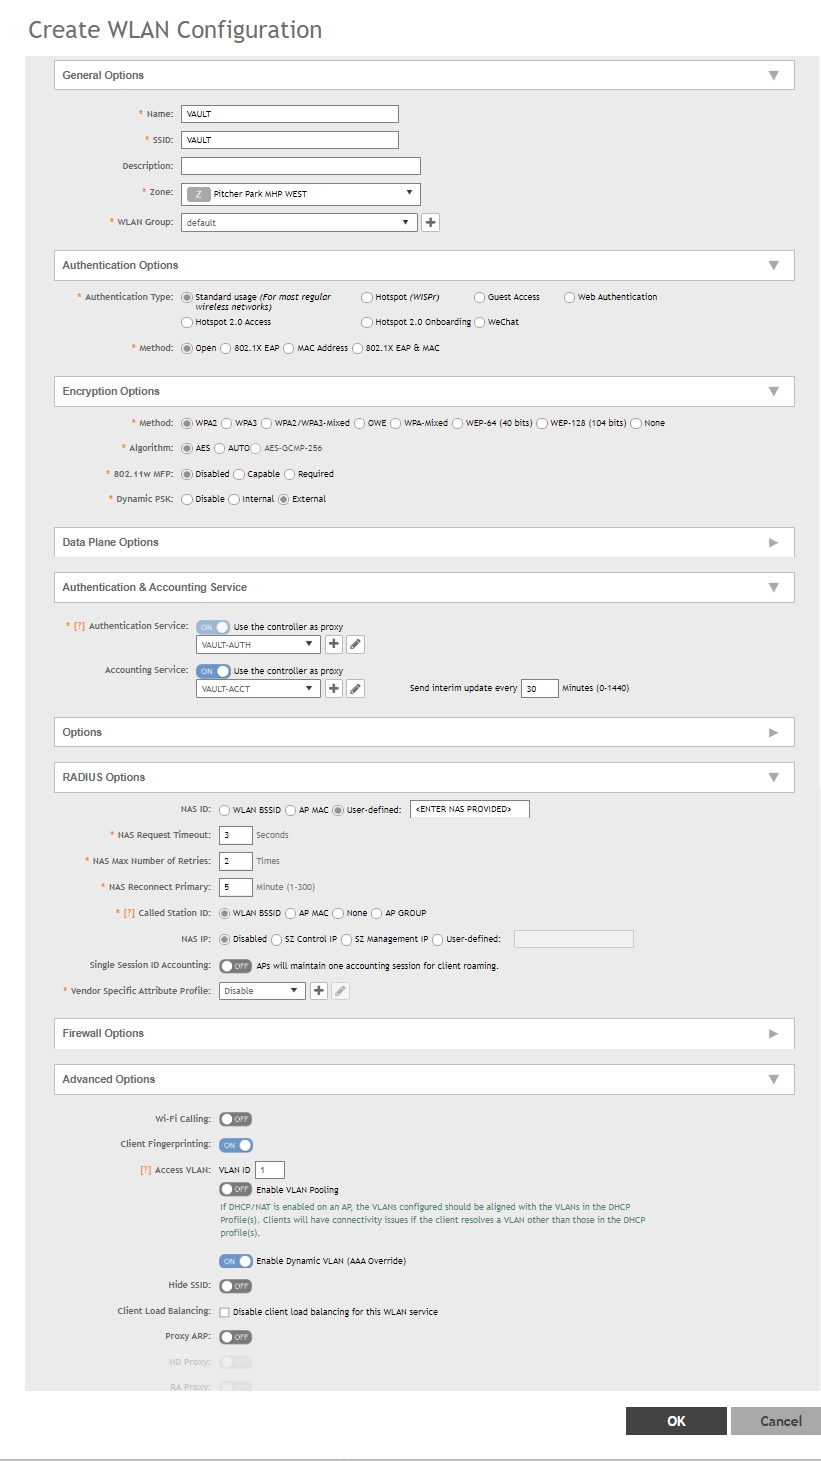
Configure WLAN

  1. Click Wireless LANs

  2. Select the Zone in which you wish to create the SSID

  3. Select the Group in which you want to create the SSID

  4. Click Create

  5. Enter the following Information

    • Name: VAULT

    • SSID: VAULT

    • Authentication Options

      • Authentication Type: Standard Usage

      • Method: Open

    • Encryption Options

      • Method WPA2

      • Algorithm: AES

      • 802.11w MFP: Disabled

      • Dynamic PSK: External

    • Authentication & Accounting Service

      • Authentication Service: ON Use the controller as proxy

      • Select VAULT-AUTH

      • Accounting Service: ON Use the controller as proxy

      • Send Interim Update every 30 Minutes

    • Options

      • Wireless Client Isolation: Set as needed for venue

    • RADIUS Options

      • NAS ID: User-Defined: <Provided via VAULT Representative>

      • NAS Request Timeout: 20 Seconds

      • NAS Max Number Retries: 2 Times

      • NAS Reconnect Primary: 5 Minutes

      • Called Station ID: AP MAC

      • NAS IP: User-Defined: <Public IP Address of SZ/VSZ>

      • Single Session ID Accounting: Off

      • Vendor Specific Attribute Profile: Disabled

    • Advanced Options

      • Access VLAN

        • VLAN ID: Set as appropriate for Venue

        • Enable Dynamic VLAN (AAA Override) - Set as appropriate for Venue

    • All other fields can be default or set as appropriate for Venue