Knowledge Base
  • Getting Started
    • Quick Start
    • Knowledge Base
    • Contact RoamingiQ
    • New Customer Onboarding
  • Network Equipment
    • Supported Access Points
    • Access Point Configuration Guides
      • What You'll Need
      • Ruckus Virtual Smart Zone 5.4
      • Ruckus Virtual Smart Zone 6.1
      • Ruckus One
      • Ruckus Unleashed
      • Cambium cnMaestro X
      • TP Link Omada Pro
      • Aruba Central
      • Cisco Meraki
    • Supported Routers
    • Router Configuration Guides
      • Mikrotik
  • Network Administrator Console
    • Network Administrator Console Introduction
    • Network Operator Settings
      • E-mail Templates
      • Terms and Conditions
      • Display Options
      • Network Administrators
      • Service Plans
      • FCC Broadband Labels
      • Keypools
      • Shopping Cart
        • Shopping Cart Payment Rules
      • Realpage
      • Webhooks
      • Network Operator Logs
      • Gateway Errors and Pending Changes
    • Creating a New Venue
      • Venue Details/General Information
      • Venue Details/Configuration Options
      • Overlapping Subscriptions
      • Add Venue Units
      • Add and Remove Service Plans to Venue
      • Add a Keypool to a Venue
      • Add Venue Administrators to a Venue
      • Add Equipment to a Venue
      • Configure Venue Shopping Cart
      • Connect a Venue to RealPage
      • Migrating a Venue to VAULT From Another Provider
    • Managing Your Subscribers
      • Add Subscribers to a Venue
      • View and Modify Subscriber Details
      • Ending a Subscription
      • Issuing a Refund or Credit
      • Messaging Subscribers
      • View Subscriber Bandwidth
      • View, Modify, and Test Subscriber Wi-Fi Passwords
      • View Subscriber Transaction History
      • View Subscriber Logs
      • View Subscriber Devices
      • View System Data
      • Permanently Delete a Subscriber Record
    • Managing Your Venues
      • View and Modify Venue Details
      • View and Modify Venue Units
      • Export Units
      • View Venue Bandwidth
      • View Venue Logs
      • View Venue Transaction History
      • Delete a Venue
    • How to Change Roles
    • SMS Sign Up
  • Venue Administrator Console
    • Venue Administrator Console Introduction
    • Venue Administrator Dashboard
      • Add Subscribers
      • Add Guests
      • Add Venue Administrators
      • Message Subscribers
      • Activity Summary
      • Service Status
      • Support Summary
      • Quick Search
      • Recent Service Activations
      • Renew or Confirm Upcoming Expirations
    • Managing Your Subscribers
      • View and Modify Subscriber Details
      • Ending a Subscription
      • View Subscriber Bandwidth
      • View Subscriber Transactions
      • Resend Activation E-mail
      • Export Subscribers
    • Support
  • Subscriber Console
    • Subscriber Console Introduction
    • Subscriber Account Activation
    • Subscriber Self-Sign Up
  • Developers
    • API Documentation
    • Sample Webhook Payloads
  • Property Management Group
Powered by GitBook
On this page
  • Configuration Steps Overview
  • Configure AAA Authentication Server
  • Configure AAA Accounting Server
  • Configure WLAN
  • Set NAS Identifier

Was this helpful?

  1. Network Equipment
  2. Access Point Configuration Guides

Ruckus Unleashed

Here is a step-by-step guide on how to configure Ruckus Unleased to work with VAULT.

PreviousRuckus OneNextCambium cnMaestro X

Last updated 3 months ago

Was this helpful?

Configuration Steps Overview

  1. Configure AAA Authentication Server

  2. Configure AAA Accounting Server

  3. Configure WLAN

  4. Configure NAS-Identifier

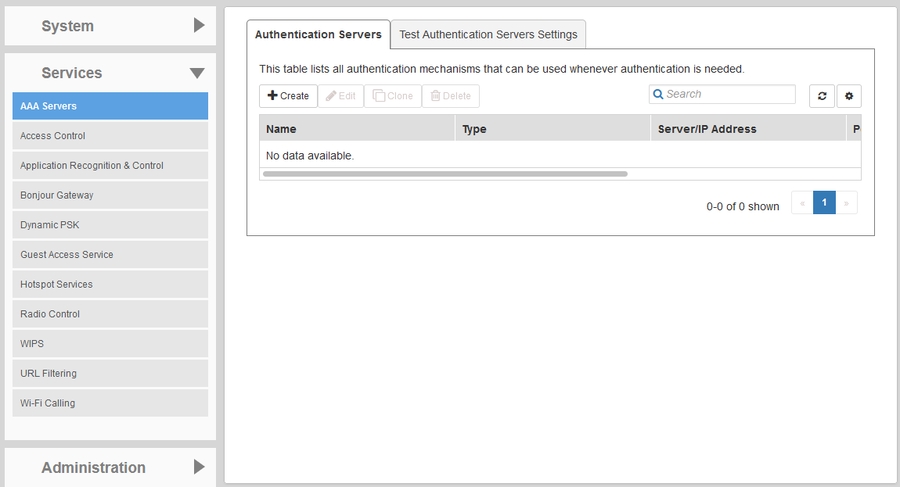
Configure AAA Authentication Server

  1. Select Admin & Services

  2. Select Services

  3. Select AAA Services

  4. Click +Create

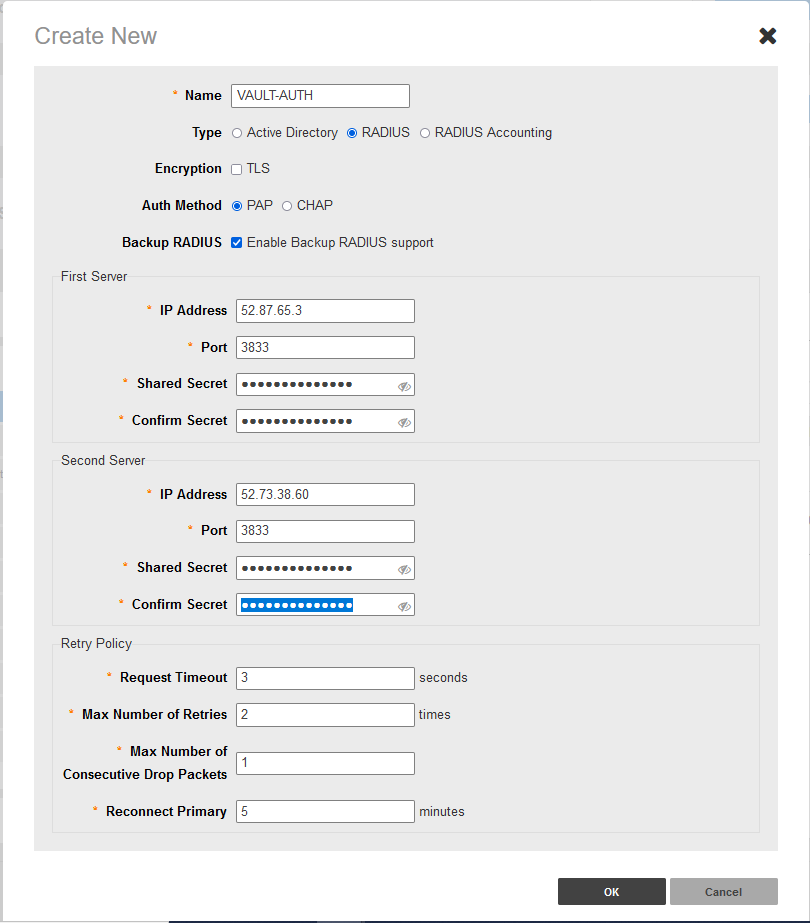
  1. Enter the following information

    • Name: VAULT-AUTH

    • Type: RADIUS

    • Auth Method: PAP

    • Enable Backup RADIUS support

    • First Server

      • IP Address: xx.xx.xx.x

      • Port: xxxx

      • Shared Secret: XXXXXXX

      • Confirm Secret: XXXXXXX

  • Second Server

    • IP Address: xx.xx.xx.x

    • Port: xxxx

    • Shared Secret: XXXXXXX

    • Confirm Secret: XXXXXXX

  • Retry Policy

    • Request Timeout: 3 Seconds

    • Max Number of Retries: 2

    • Max Number of Consecutive Drop Packets: 1

    • Reconnect Primary: 5 Minutes

    • Click OK

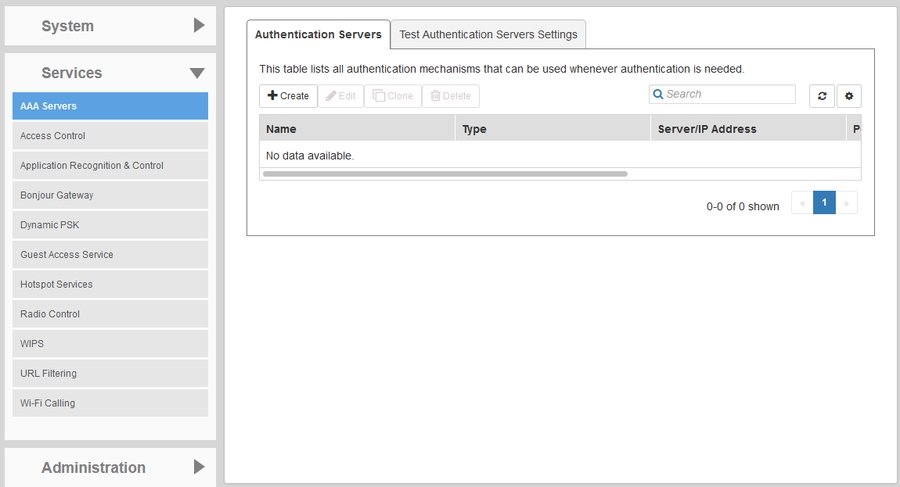
Configure AAA Accounting Server

  1. Select Admin & Services

  2. Select Services

  3. Select AAA Services

  4. Click +Create

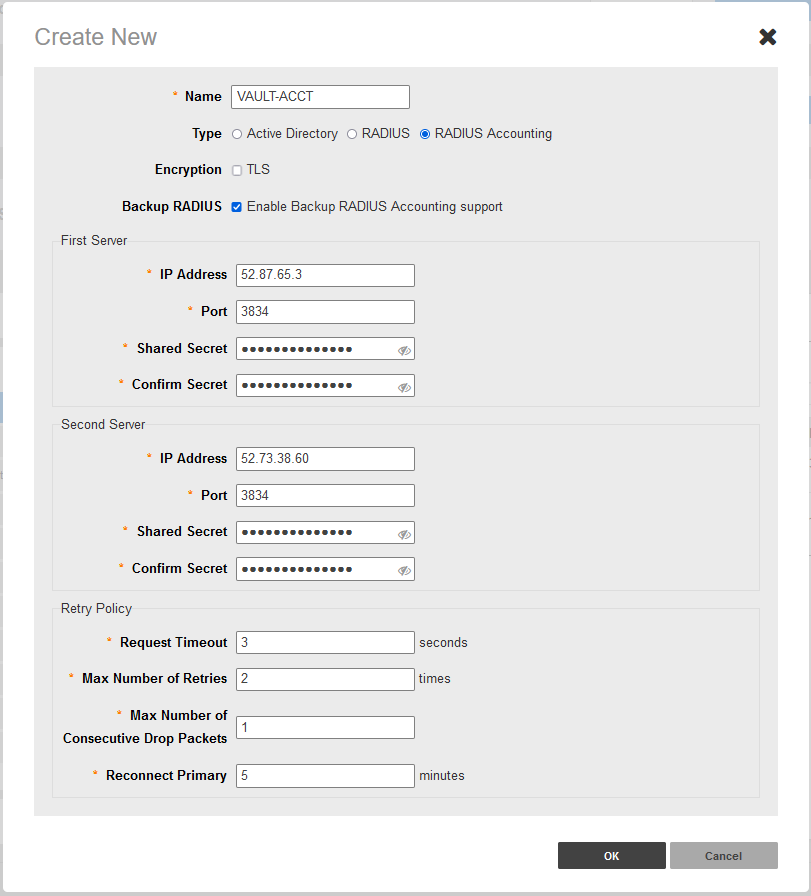
  1. Enter the following information

    • Name: VAULT-ACCT

    • Type: RADIUS Accounting

    • Enable Backup RADIUS Accounting support

    • First Server

      • IP Address: xx.xx.xx.x

      • Port: xxxx

      • Shared Secret: XXXXXXX

      • Confirm Secret: XXXXXXX

    • Second Server

      • IP Address: xx.xx.xx.x

      • Port: xxxx

      • Shared Secret: XXXXXXX

      • Confirm Secret: XXXXXXX

    • Retry Policy

      • Request Timeout: 3 Seconds

      • Max Number of Retries: 2

      • Max Number of Consecutive Drop Packets: 1

      • Reconnect Primary: 5 Minutes

    • Click OK

Configure WLAN

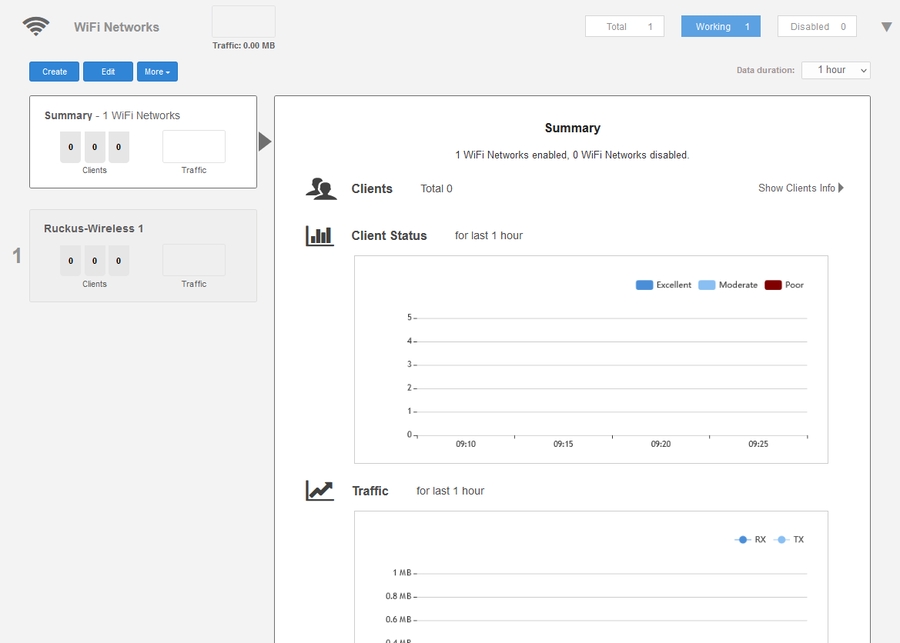
  1. Select Wi-Fi Networks

  2. Click Create

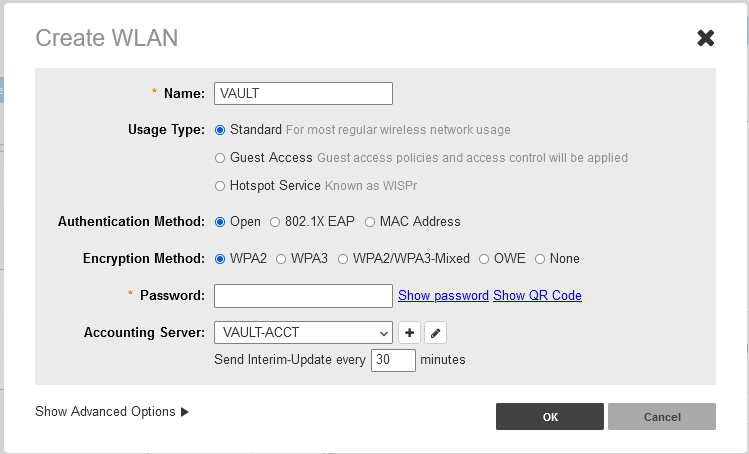
  3. Enter the following information

  • Name: VAULT

  • Usage Type: Standard

  • Authentication Method: Open

  • Encryption Method: WPA2

  • Password: Leave as BLANK

  • Accounting Server: VAULT-ACCT

  • Send Interim-Update every 30 Minutes

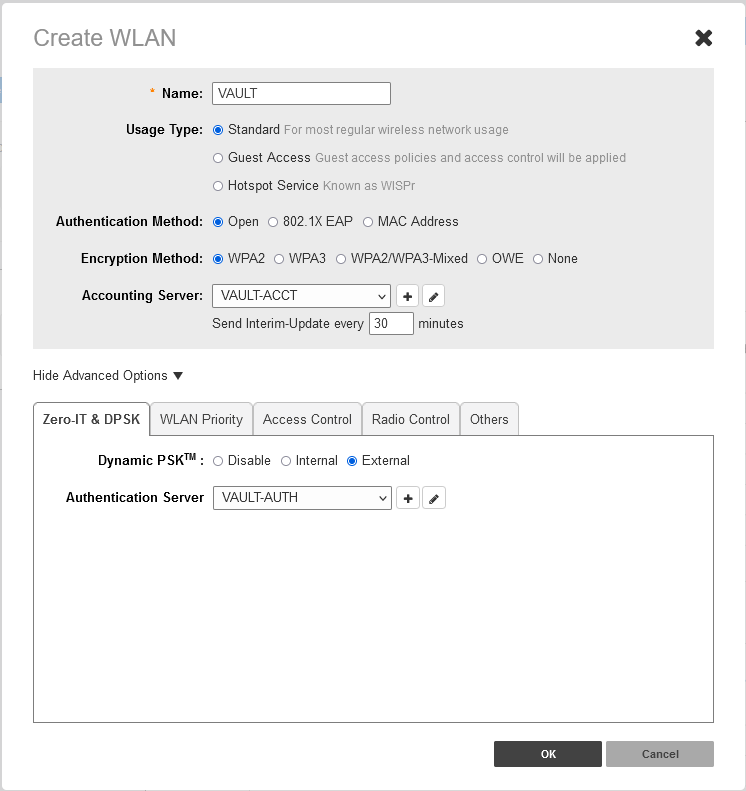
  1. Select Show Advanced Options

  2. Select Zero-IT & DPSK Tab

  3. Change Dynamic PSK to External

  4. Select Authentication Server: VAULT-AUTH

  5. Optional for Multiple VLAN (PAN) Deployments

  • Select WLAN Priority Tab

  • Select Enable Dynamic VLAN

  • Click OK

Set NAS Identifier

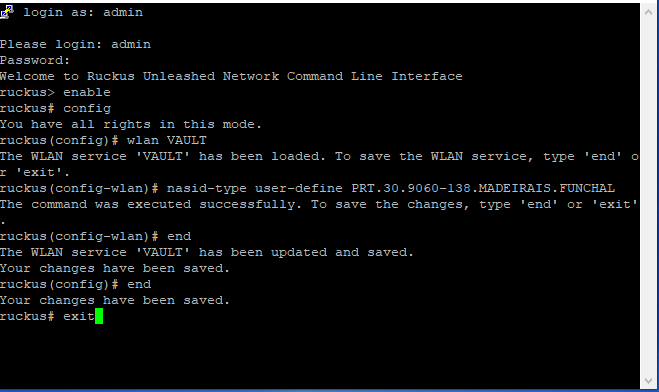
  1. Open Putty and SSH into Access Point

  2. Type: enable to enter enable context options

  3. Type: config to enter configuration context options

  4. Type: wlan VAULT to enter SSID specific context options

  5. Type: nasid-type user-define <NAS ID PROVIDED BY RoamingIQ>

  6. Type: end

  7. Type: end

  8. Type: exit