Knowledge Base
  • Getting Started
    • Quick Start
    • Knowledge Base
    • Contact RoamingiQ
    • New Customer Onboarding
  • Network Equipment
    • Supported Access Points
    • Access Point Configuration Guides
      • What You'll Need
      • Ruckus Virtual Smart Zone 5.4
      • Ruckus Virtual Smart Zone 6.1
      • Ruckus One
      • Ruckus Unleashed
      • Cambium cnMaestro X
      • TP Link Omada Pro
      • Aruba Central
      • Cisco Meraki
    • Supported Routers
    • Router Configuration Guides
      • Mikrotik
  • Network Administrator Console
    • Network Administrator Console Introduction
    • Network Operator Settings
      • E-mail Templates
      • Terms and Conditions
      • Display Options
      • Network Administrators
      • Service Plans
      • FCC Broadband Labels
      • Keypools
      • Shopping Cart
        • Shopping Cart Payment Rules
      • Realpage
      • Webhooks
      • Network Operator Logs
      • Gateway Errors and Pending Changes
    • Creating a New Venue
      • Venue Details/General Information
      • Venue Details/Configuration Options
      • Overlapping Subscriptions
      • Add Venue Units
      • Add and Remove Service Plans to Venue
      • Add a Keypool to a Venue
      • Add Venue Administrators to a Venue
      • Add Equipment to a Venue
      • Configure Venue Shopping Cart
      • Connect a Venue to RealPage
      • Migrating a Venue to VAULT From Another Provider
    • Managing Your Subscribers
      • Add Subscribers to a Venue
      • View and Modify Subscriber Details
      • Ending a Subscription
      • Issuing a Refund or Credit
      • Messaging Subscribers
      • View Subscriber Bandwidth
      • View, Modify, and Test Subscriber Wi-Fi Passwords
      • View Subscriber Transaction History
      • View Subscriber Logs
      • View Subscriber Devices
      • View System Data
      • Permanently Delete a Subscriber Record
    • Managing Your Venues
      • View and Modify Venue Details
      • View and Modify Venue Units
      • Export Units
      • View Venue Bandwidth
      • View Venue Logs
      • View Venue Transaction History
      • Delete a Venue
    • How to Change Roles
    • SMS Sign Up
  • Venue Administrator Console
    • Venue Administrator Console Introduction
    • Venue Administrator Dashboard
      • Add Subscribers
      • Add Guests
      • Add Venue Administrators
      • Message Subscribers
      • Activity Summary
      • Service Status
      • Support Summary
      • Quick Search
      • Recent Service Activations
      • Renew or Confirm Upcoming Expirations
    • Managing Your Subscribers
      • View and Modify Subscriber Details
      • Ending a Subscription
      • View Subscriber Bandwidth
      • View Subscriber Transactions
      • Resend Activation E-mail
      • Export Subscribers
    • Support
  • Subscriber Console
    • Subscriber Console Introduction
    • Subscriber Account Activation
    • Subscriber Self-Sign Up
  • Developers
    • API Documentation
    • Sample Webhook Payloads
  • Property Management Group
Powered by GitBook
On this page
  • Configuration Steps Overview
  • Verify Prerequisites
  • Configure RADIUS Profile
  • Configure WLAN

Was this helpful?

  1. Network Equipment
  2. Access Point Configuration Guides

TP Link Omada Pro

Here is a step-by-step guide on how to configure TP-Link Omada Pro to work with VAULT.

PreviousCambium cnMaestro XNextAruba Central

Last updated 1 year ago

Was this helpful?

Configuration Steps Overview

  1. Verify Prerequisites

  2. Configure RADIUS Profile

  3. Configure WLAN

Verify Prerequisites

  1. Verify an Access Point Group has been created (outside the scope of this document)

  2. Verify an Access Point is associated to the Access Point Group (outside the scope of this document)

  3. Verify Access Point firmware of EAP653v1 or later

  4. Verify Omada Pro Firmware 5.9.50 or later

Configure RADIUS Profile

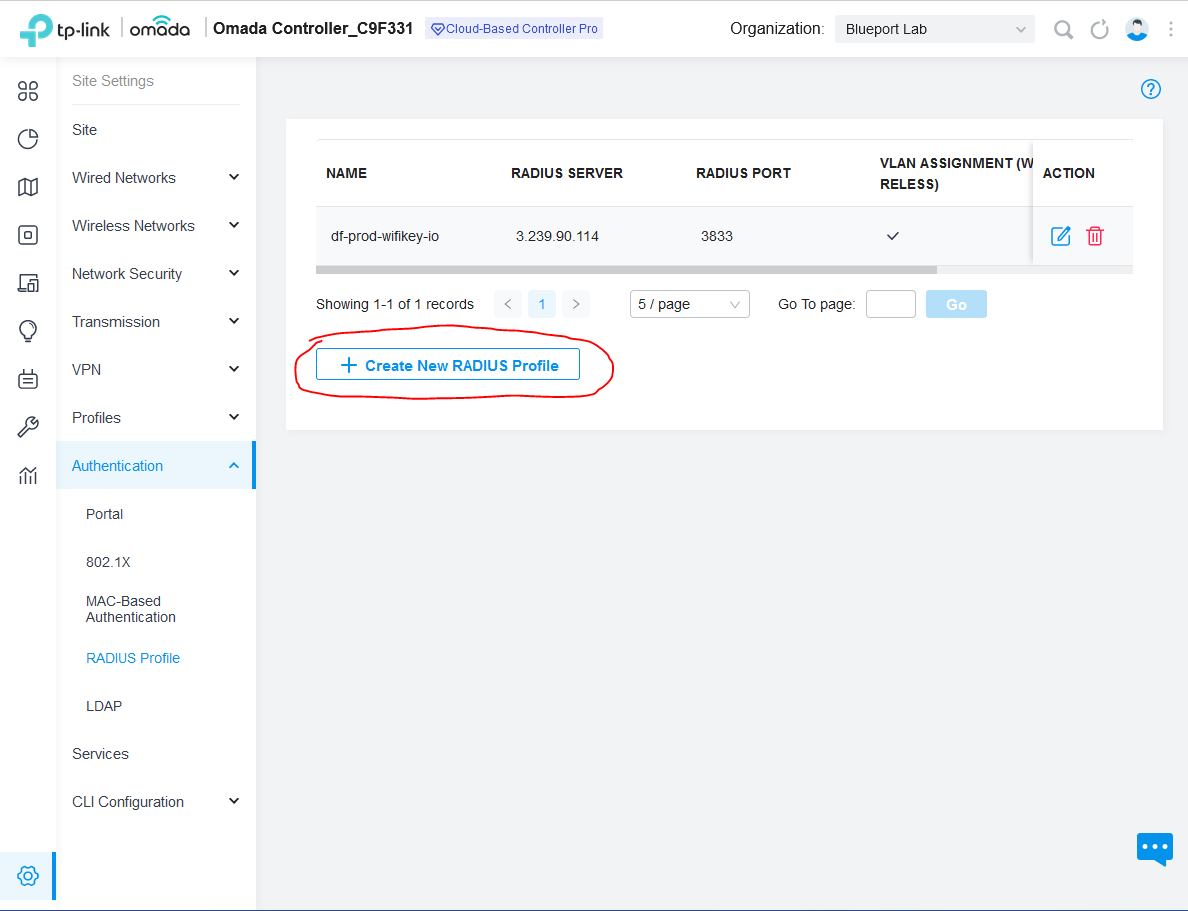
  1. From the Omada Controller Dashboard Click on Settings

  2. Click Expand Authentication Option

  3. Click on RADIUS Profile

  4. Click +Create New RADIUS Profile

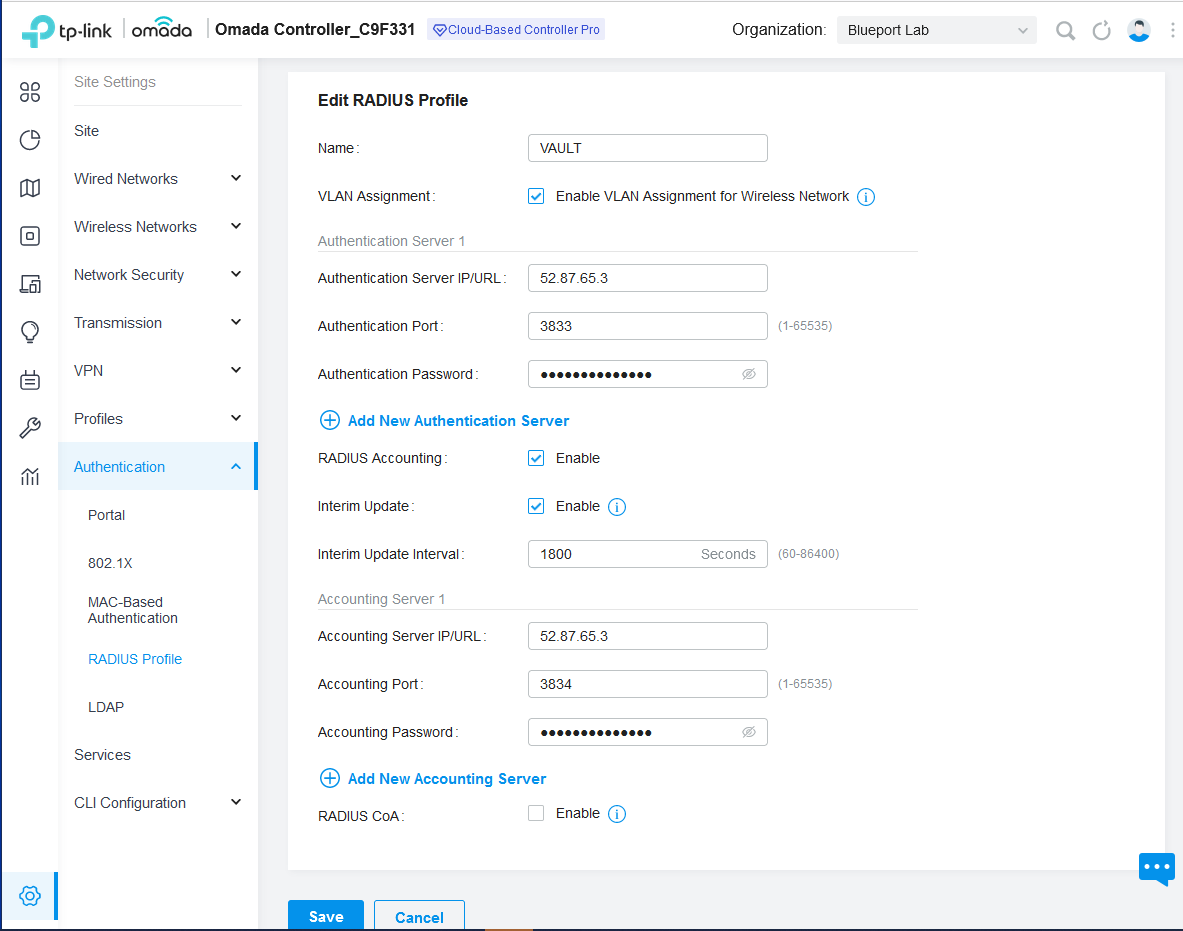
  1. Under Create New RADIUS Profile set the following information

    • Name: VAULT

    • Select Enable VLAN Assignment for Wireless Network to enable it

    • Under Authentication Server 1

      • Authentication Server IP/URL: xx.xx.xx.x

      • Authentication Port: xxxx

      • Authentication Password: XXXXXXX

    • Select RADIUS Accounting: To enable Accounting Server

    • Select Interim Update: To enable Interim Updates

      • Interim Update Interval: 1800 Seconds

    • Under Accounting Server 1

      • Accounting Server IP/URL: xx.xx.xx.x

      • Accounting Port: xxxx

      • Accounting Password: XXXXXXX

  2. Click Save

Configure WLAN

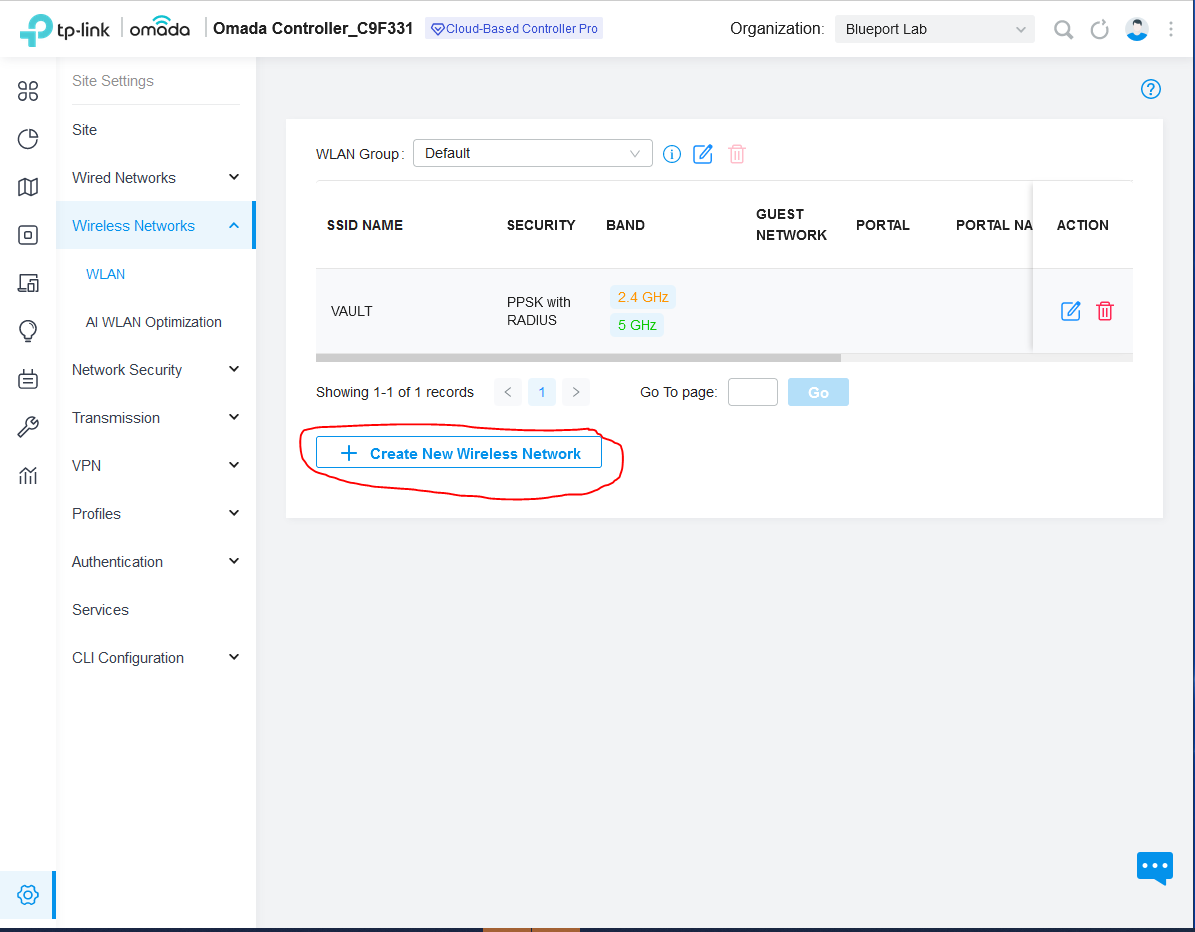
  1. From the Omada Controller Dashboard Click on Settings

  2. Click Expand Wireless Networks Option

  3. Click on WLAN

  4. Click +Create New Wireless Network

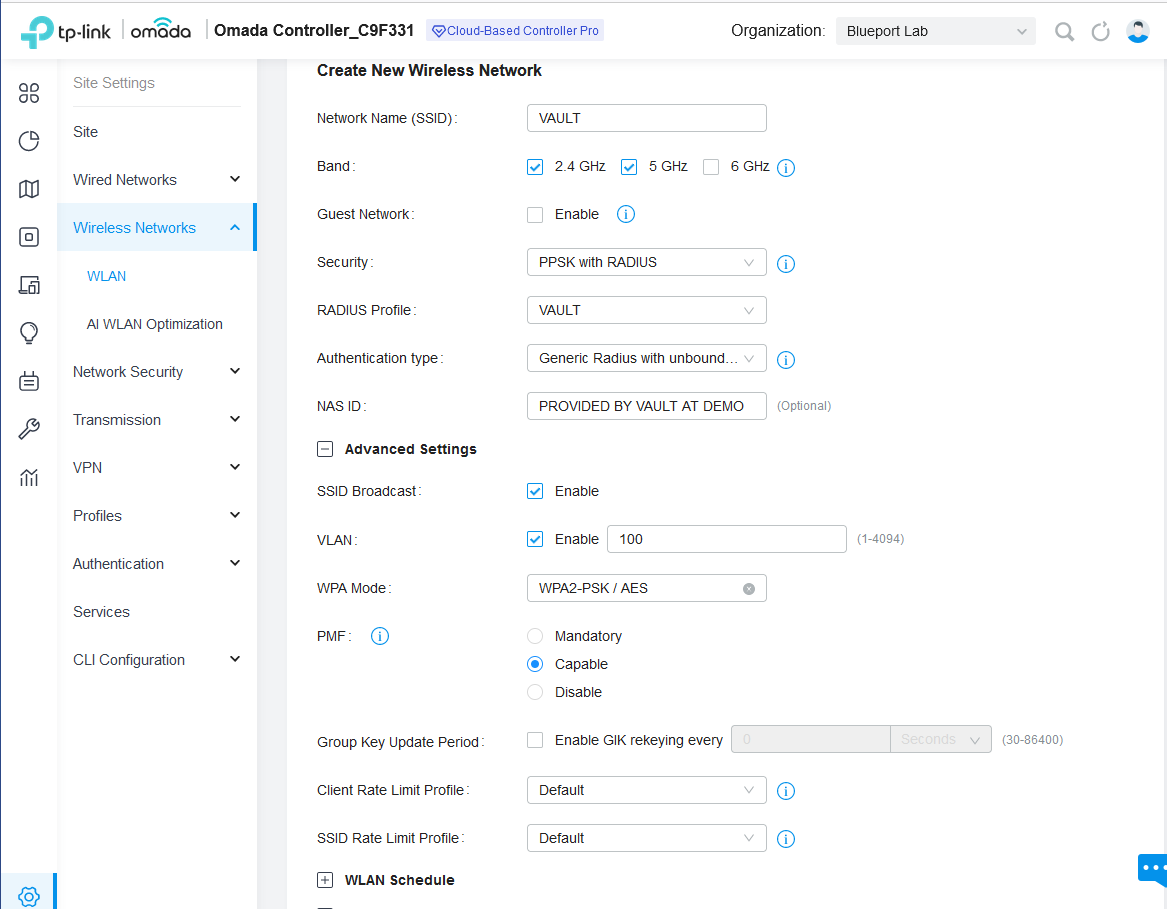
  1. Under Create New Wireless Network set the following information

      • Network Name (SSID): VAULT

      • Band:

        • Select 2.4 GHz to enable 2.4 GHz

        • Select 5 GHz to enable 5 GHz

        • De-Select 6 GHz to DISABLE 6 GHz

      • Guest Network: De-Select to DISABLE

      • Security: Select PPSK with RADIUS

      • RADIUS Profile: Select VAULT (created in previous steps)

      • Authentication Type: Select Generic Radius with unbound MAC

      • NAS ID: RoamingIQ Will Provide the NAS-Identifier to use

      • Expand Advanced Settings

        • VLAN: Click to Enable

          • Enter a standard VLAN ID for your organization

  2. Set all other values to best practices

  3. Click Apply