Knowledge Base
  • Getting Started
    • Quick Start
    • Knowledge Base
    • Contact RoamingiQ
    • New Customer Onboarding
  • Network Equipment
    • Supported Access Points
    • Access Point Configuration Guides
      • What You'll Need
      • Ruckus Virtual Smart Zone 5.4
      • Ruckus Virtual Smart Zone 6.1
      • Ruckus One
      • Ruckus Unleashed
      • Cambium cnMaestro X
      • TP Link Omada Pro
      • Aruba Central
      • Cisco Meraki
    • Supported Routers
    • Router Configuration Guides
      • Mikrotik
  • Network Administrator Console
    • Network Administrator Console Introduction
    • Network Operator Settings
      • E-mail Templates
      • Terms and Conditions
      • Display Options
      • Network Administrators
      • Service Plans
      • FCC Broadband Labels
      • Keypools
      • Shopping Cart
        • Shopping Cart Payment Rules
      • Realpage
      • Webhooks
      • Network Operator Logs
      • Gateway Errors and Pending Changes
    • Creating a New Venue
      • Venue Details/General Information
      • Venue Details/Configuration Options
      • Overlapping Subscriptions
      • Add Venue Units
      • Add and Remove Service Plans to Venue
      • Add a Keypool to a Venue
      • Add Venue Administrators to a Venue
      • Add Equipment to a Venue
      • Configure Venue Shopping Cart
      • Connect a Venue to RealPage
      • Migrating a Venue to VAULT From Another Provider
    • Managing Your Subscribers
      • Add Subscribers to a Venue
      • View and Modify Subscriber Details
      • Ending a Subscription
      • Issuing a Refund or Credit
      • Messaging Subscribers
      • View Subscriber Bandwidth
      • View, Modify, and Test Subscriber Wi-Fi Passwords
      • View Subscriber Transaction History
      • View Subscriber Logs
      • View Subscriber Devices
      • View System Data
      • Permanently Delete a Subscriber Record
    • Managing Your Venues
      • View and Modify Venue Details
      • View and Modify Venue Units
      • Export Units
      • View Venue Bandwidth
      • View Venue Logs
      • View Venue Transaction History
      • Delete a Venue
    • How to Change Roles
    • SMS Sign Up
  • Venue Administrator Console
    • Venue Administrator Console Introduction
    • Venue Administrator Dashboard
      • Add Subscribers
      • Add Guests
      • Add Venue Administrators
      • Message Subscribers
      • Activity Summary
      • Service Status
      • Support Summary
      • Quick Search
      • Recent Service Activations
      • Renew or Confirm Upcoming Expirations
    • Managing Your Subscribers
      • View and Modify Subscriber Details
      • Ending a Subscription
      • View Subscriber Bandwidth
      • View Subscriber Transactions
      • Resend Activation E-mail
      • Export Subscribers
    • Support
  • Subscriber Console
    • Subscriber Console Introduction
    • Subscriber Account Activation
    • Subscriber Self-Sign Up
  • Developers
    • API Documentation
    • Sample Webhook Payloads
  • Property Management Group
Powered by GitBook
On this page
  • Configuration Steps Overview
  • Verify Prerequisites
  • Configure WLAN
  • Configure AP Group

Was this helpful?

  1. Network Equipment
  2. Access Point Configuration Guides

Cambium cnMaestro X

Here is a step-by-step guide on how to configure Cambium cnMaestro X to work with VAULT.

PreviousRuckus UnleashedNextTP Link Omada Pro

Last updated 1 year ago

Was this helpful?

Configuration Steps Overview

  1. Verify Prerequisites

  2. Configure WLAN

  3. Configure AP Group

Verify Prerequisites

  1. Verify an Access Point Group has been created (outside the scope of this document)

  2. Verify an Access Point is associated to the Access Point Group (outside the scope of this document)

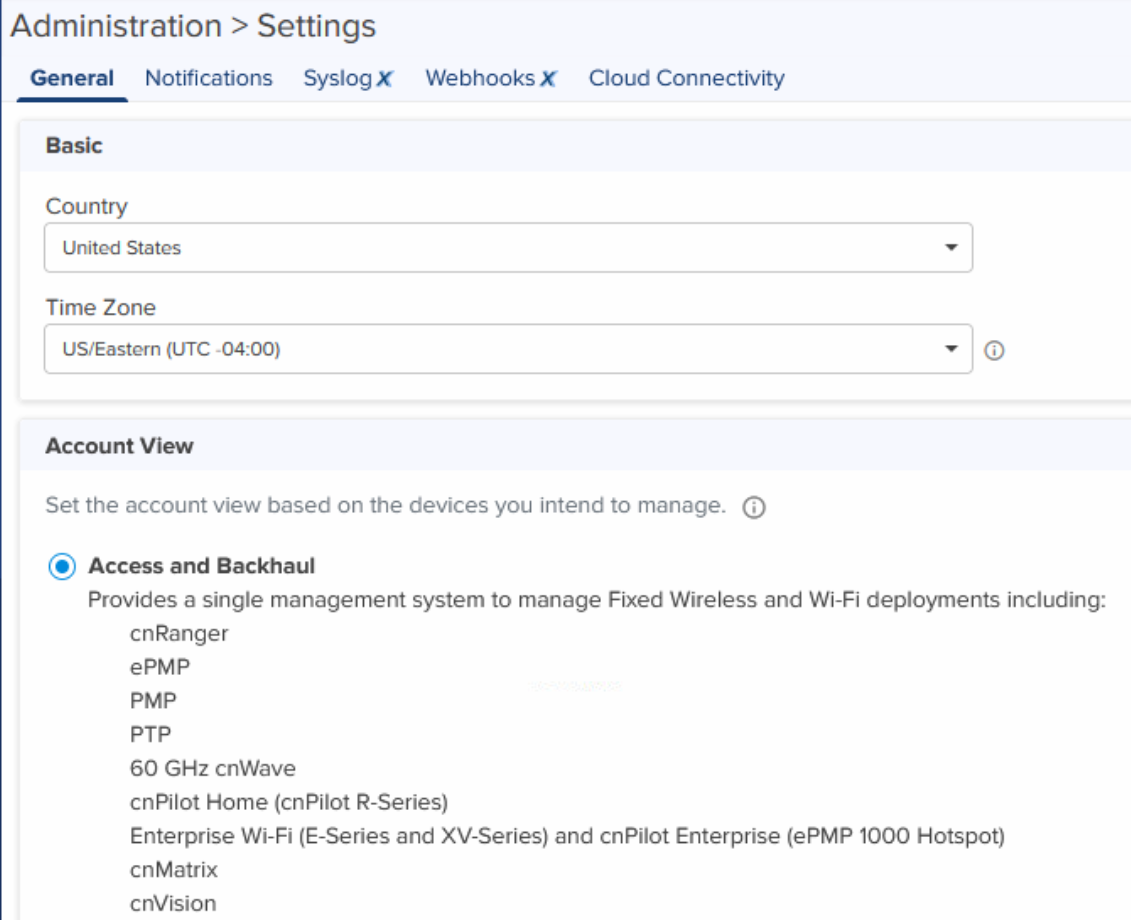
  3. Set appropriate view to follow this guide

    • Click on Administration

    • Click Settings

    • In General Tab change account view to Access and Backhaul

    • You can change this view back after following this configuration guide.
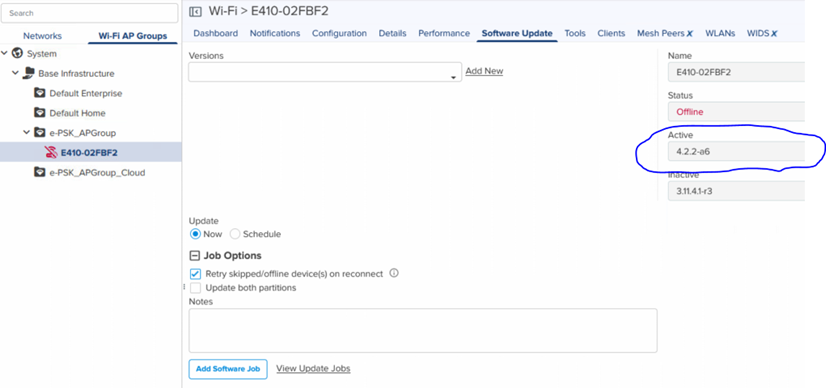
  1. Check software version on access points.

    • EPSK is supported on version 4.2.2-a6 and above

    • Click Shared Settings

    • Click WLANs and AP Groups

    • Select the AP Groups Tab

    • Click on the AP Group being used for VAULT

    • Select an AP within the AP Group

    • Select Software Update Tab

    • Verify Active Version is 4.2.2-a6 or higher
Configure WLAN

  1. Click on Shared Settings

  2. Click on WLANS and AP Groups

  3. Select (or create) WLAN Associated with AP Group

  4. Under Configuration

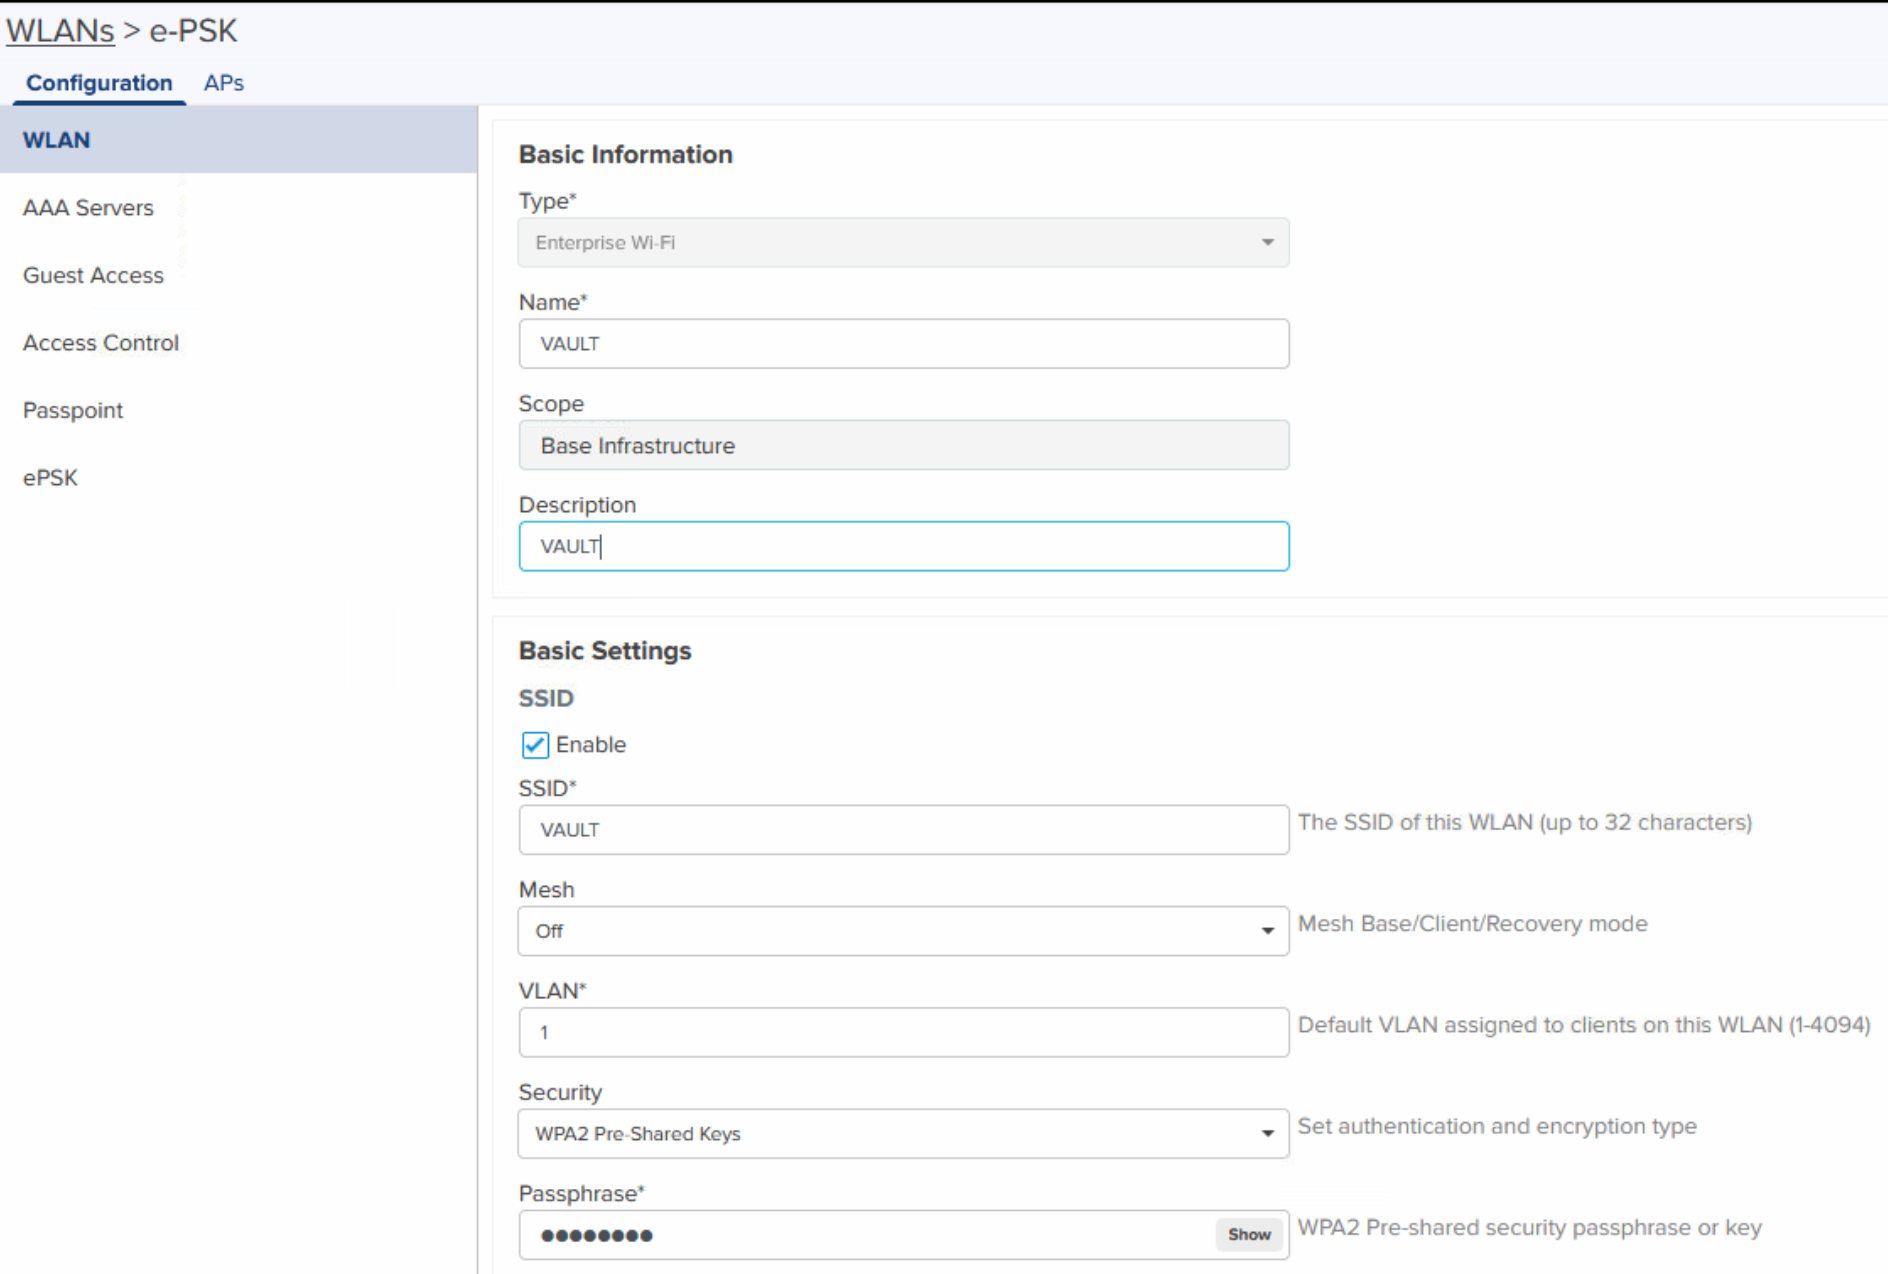
    • Select WLAN and set the following information

      • Type: Enterprise Wi-Fi

      • Name: VAULT

      • Scope: Base Infrastructure

      • Description: VAULT

      • Basic Settings

        • SSID: Enable

        • SSID: VAULT

        • Security: WPA2 Pre-Shared Keys

        • Passphrase: <Enter random passphrase>

    • All other settings should be set to Best Practices
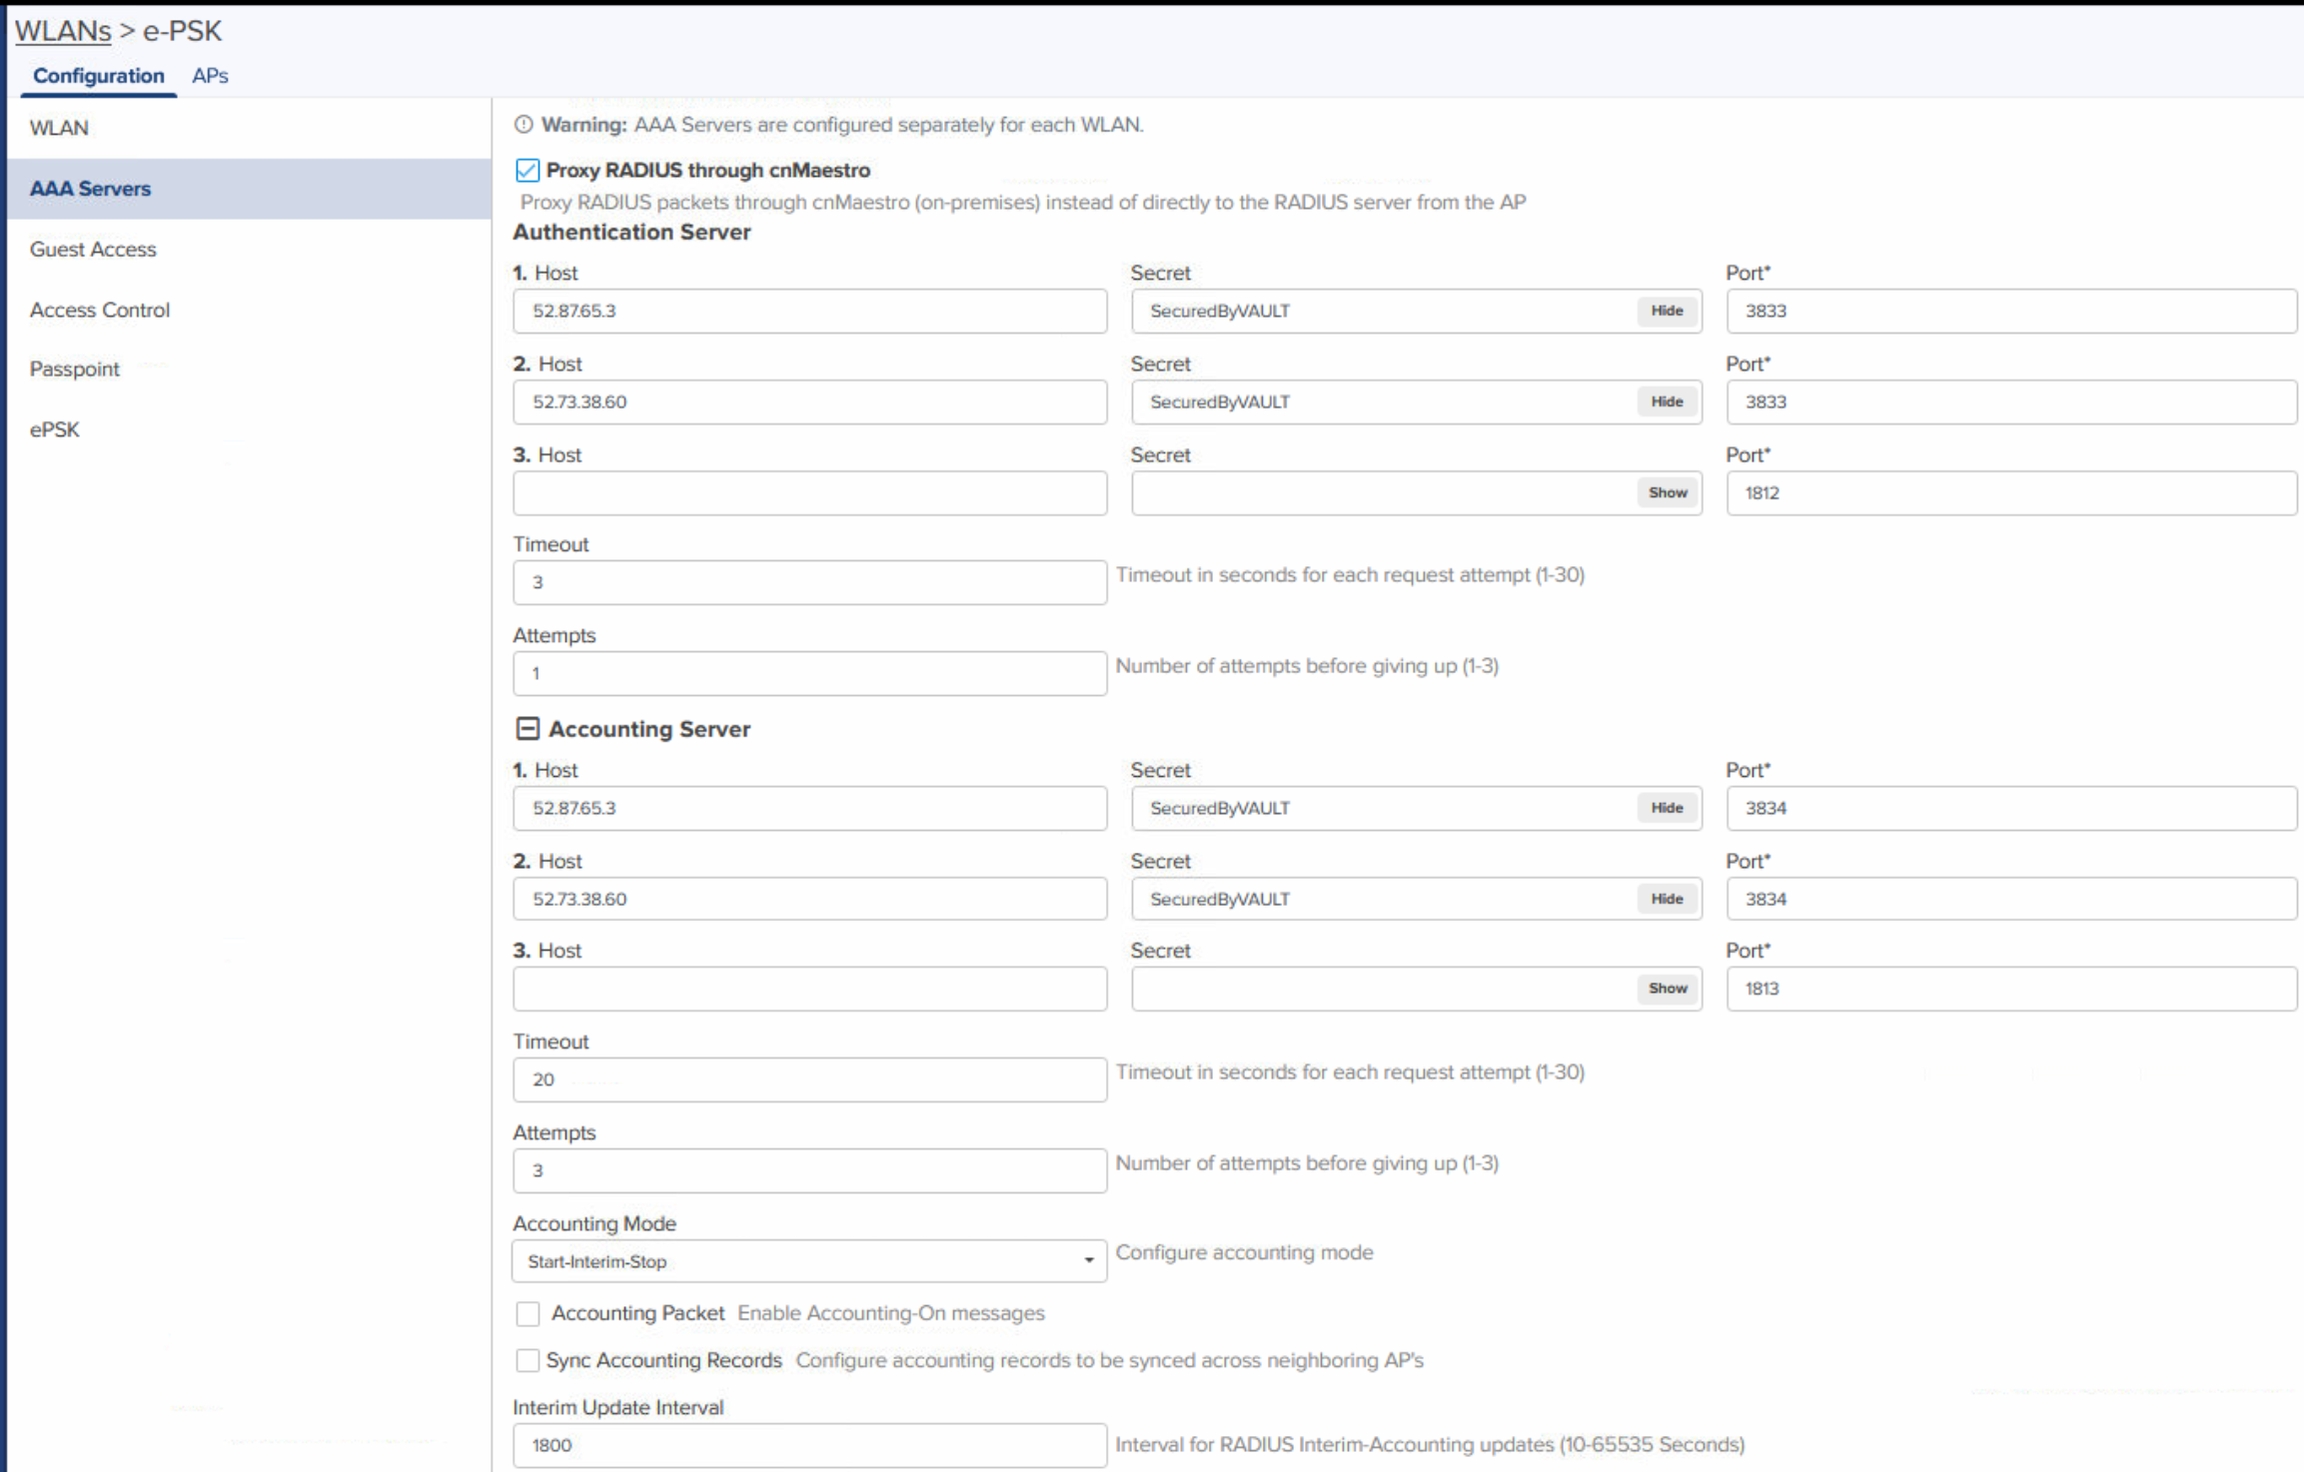
  • Select AAA Servers Under Configuration

  • If Using cnMaestro On Premise or AMI Version

    • Select “Proxy RADIUS through cnMaestro”

  • Under Authentication Server enter the following information

    • 1. Host: xx.xx.xx.x

    • Secret: XXXXXXX

    • Port: xxxx

    • 2. Host: xx.xx.xx.x

    • Secret: XXXXXXX

    • Port: xxxx

    • Timeout: 3

    • Attempts: 1

  • Under Accounting Server Enter the following information

    • 1. Host: xx.xx.xx.x

    • Secret: XXXXXXX

    • Port: xxxx

    • 2. Host: xx.xx.xx.x

    • Secret: XXXXXXX

    • Port: xxxx

    • Timeout: 20

    • Attempts: 3

    • Accounting Mode: Start-Interim-Stop

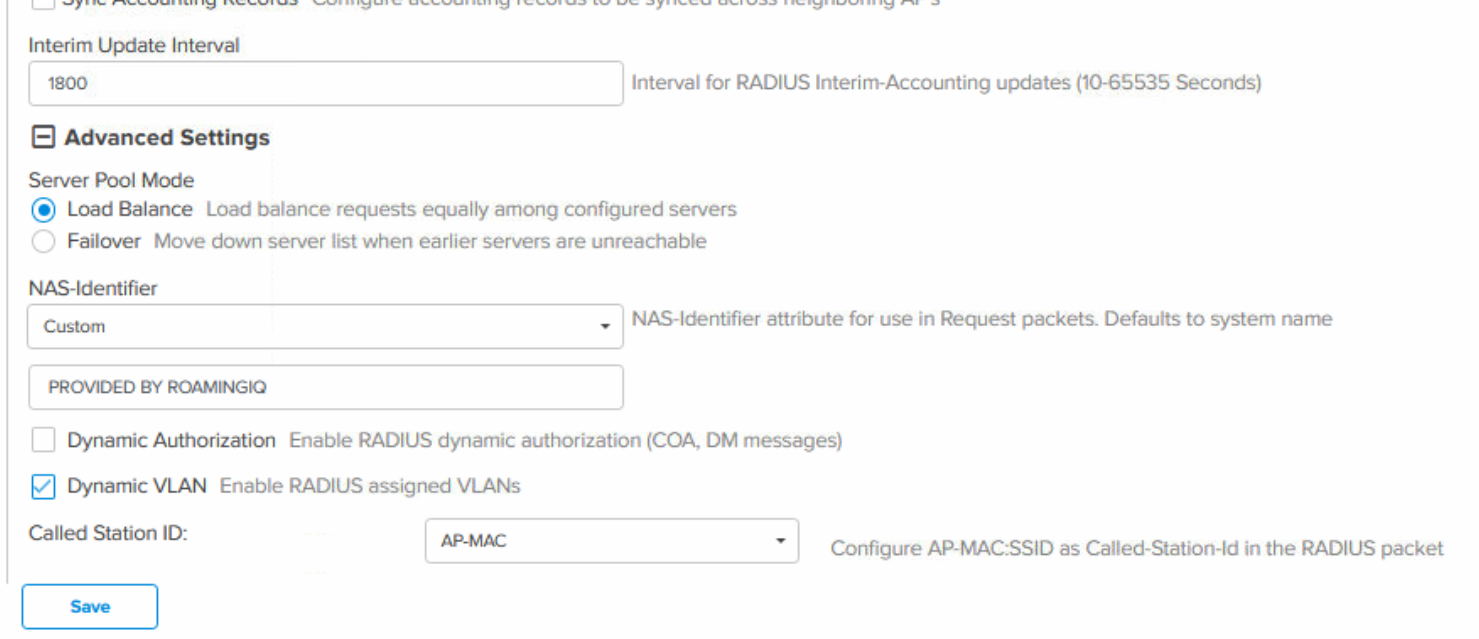
    • Interim Update Interval: 1800

  • Under Advanced Settings Enter the following information

    • NAS-Identifier: Custom

    • Custom NAS-ID: RoamingIQ Will Provide the Nas-Identifier to use

    • Dynamic VLAN: Enabled

    • Called Station ID: AP-MAC

    • Click Save

  • All other settings should remain DEFAULT or set to Best Practices
Configure AP Group

  1. Select Shared Settings

  2. Click WLANs and AP Groups

  3. Click AP Groups Tab

  4. Click AP Group Associated to WLAN and AP

  5. Select Network Under Configuration Tab

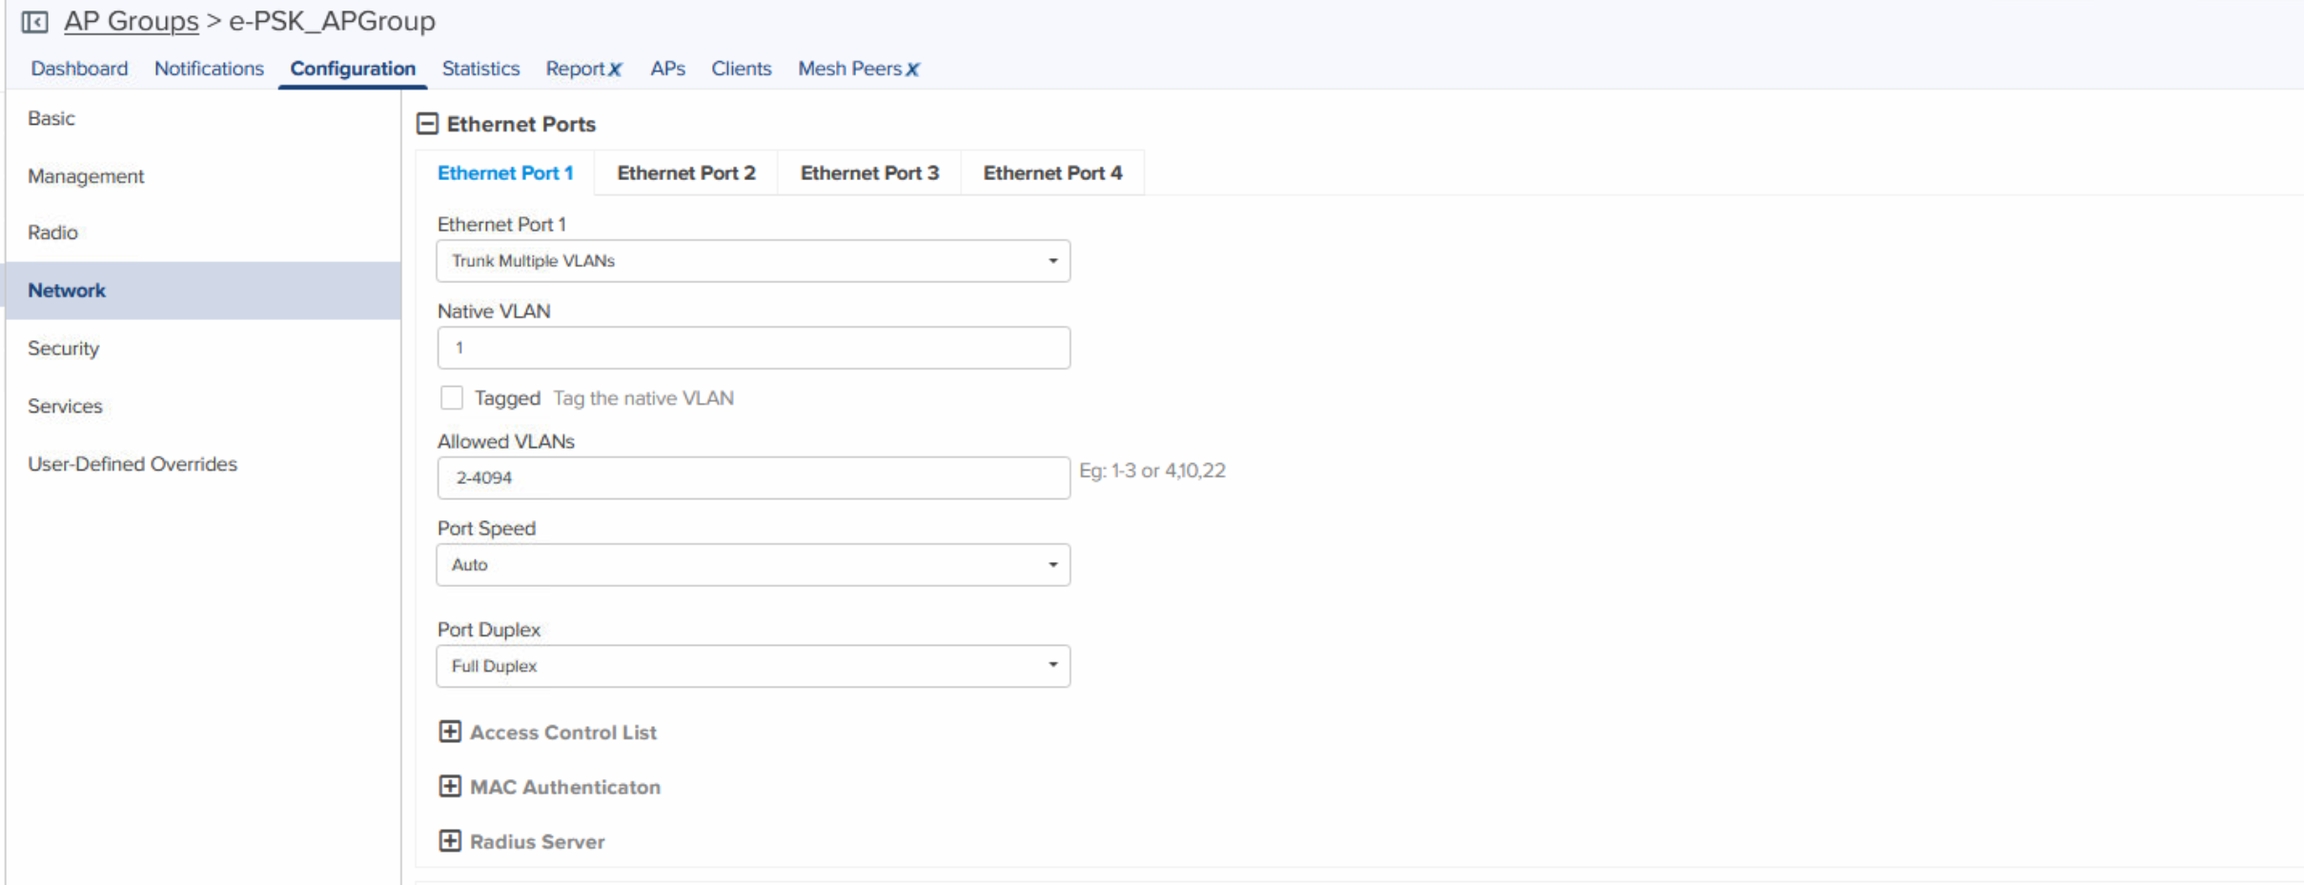
  6. Select the Interface connected to Network Infrastructure

    • Enter the following information

      • Ethernet Port Type: Trunk Multiple VLANS

      • Native VLAN: 1 (or set to your specific infrastructure)

      • Allowed VLANS: 2-4094 (or set to your specific infrastructure)

    • All other fields may remain DEFAULT or set to Best Practices
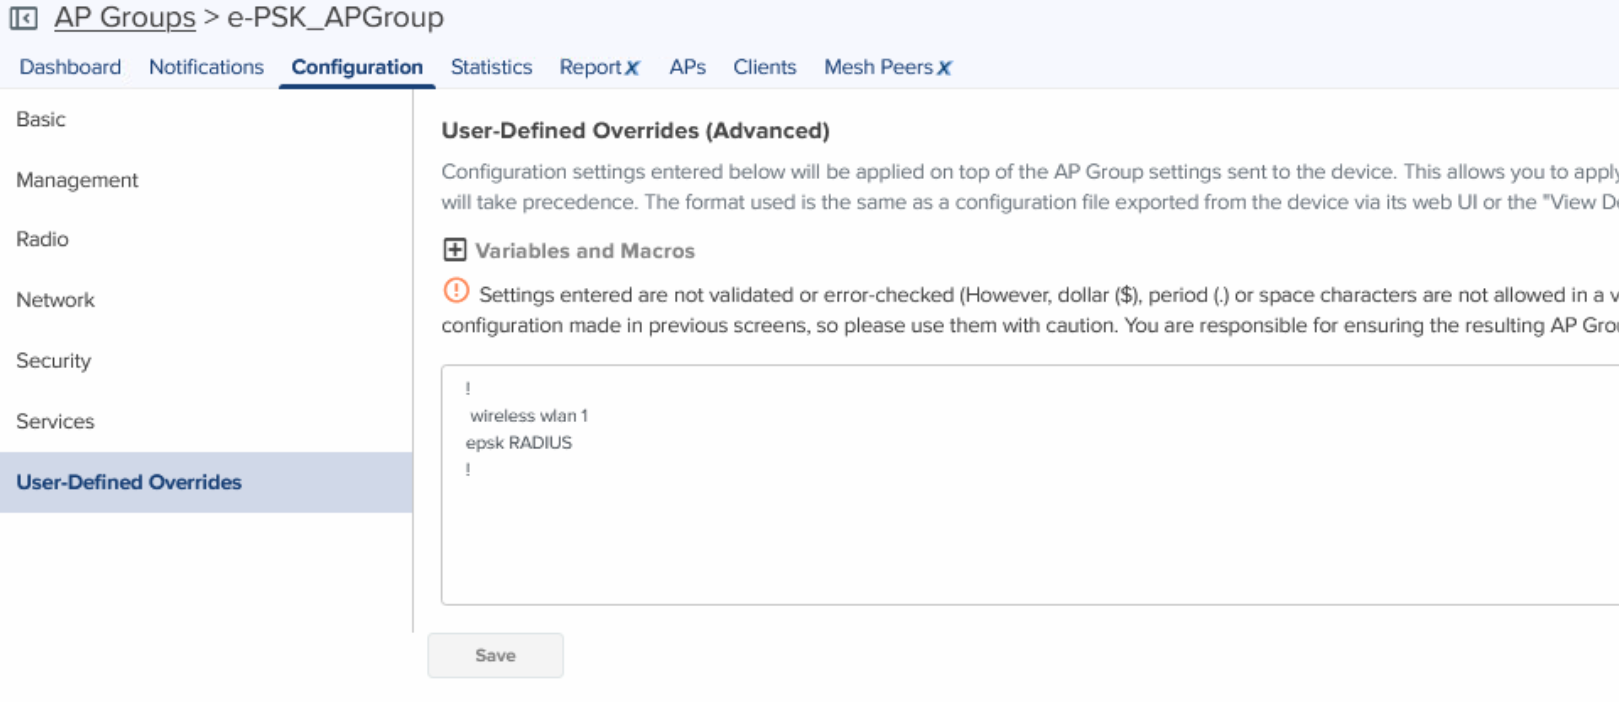
  1. Select User-Defined Overrides under Configuration

    • Enter the following information

!

wireless wlan 1

epsk RADIUS

!

    • Where wireless wlan 1 is the wlan number on the physical Access Point

      • You may need to ssh in to the AP and show the configuration to find the actual wlan #

    • Click Save

    • All other fields may remain DEFAULT or set to Best Practices